Overview
Lif Auth Server is the backbone of our platform’s identity and access management.
It provides a unified, secure way to authenticate users, issue tokens, and enforce fine‑grained authorization across all services.
Purpose
This service exists to:
- Act as the single source of trust for identity and permissions
- Issue and validate tokens for client applications
- Enforce permission nodes and role hierarchies
- Provide auditable, secure flows for authentication and authorization
Key Features
- Authentication: We use JWT‑based authentication flows with background secret rotation
- Authorization: Permission node enforcement, role hierarchies, and policy checks
- Security: We logs events to a log file and audit regularly
- Integration: Swagger‑documented API routes, automated deployment, and monitoring hooks
Architecture
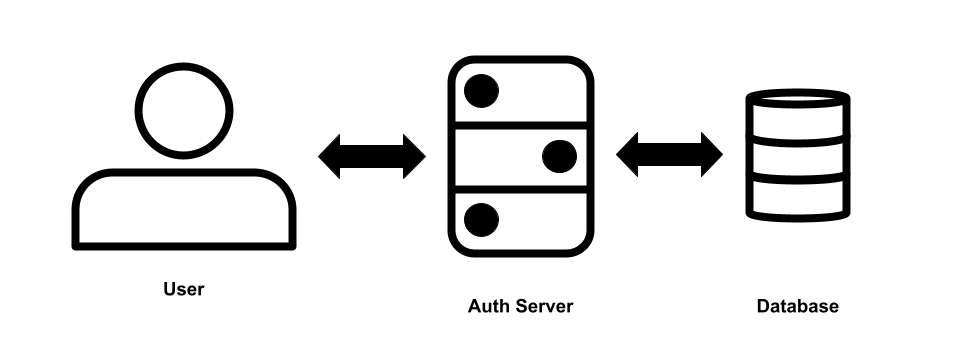
At a high level, the Auth Server interacts with:
- Client applications requesting tokens
- A secure database and cache for identity storage
- Monitoring and alerting systems for operational health
Operations
- Secrets are rotated automatically and validated across services
- Alerts and errors are surfaced through Sentry and monitoring dashboards
- Deployments are containerized and versioned for consistency
Navigation
Use the sidebar to explore:
- Authentication — login flows and token issuance
- Authorization — permission nodes and policy enforcement
- Operations — configuration, deployment, and troubleshooting
- API Reference — Swagger routes and error codes
Maintained by Lif Platforms, Auth Server is a critical component of our platform.
This documentation provides both the conceptual overview and the operational playbook needed to run it securely and effectively.
Authentication
Authentication is how our users log into the service. Auth Server provided a centralized way to log into any Lif Platforms service with one account. This eliminates the need to create an account for each service as well as eliminates the hassle of building out a new system for each service. This page will go over the process that users take when logging into the service.
Logging In
Users are directed to our centralized login page my.lifplatforms.com/login when logging into a service. Some services such as Ringer have their own login pages. These pages interface with Auth Server for the login process. Here are the steps that users take during the login process:
-
Username/Password: Users enter their username and password into the login form. This data is sent to Auth Server in the form of form data.
-
Checking Credentials: Lif Platforms uses hashing for storing passwords for enhanced security. When checking credentials, Auth Server grabs the username, password hash, and salt from our database. Then, we use the database salt to hash the password provided in the form data. If both usernames and both password hashes are the same, the login succeeds. If not, the login fails.
-
2-Factor Authentication: If the user has this feature enabled, an additional step will be required for a successful login. If the username and password checks succeed, but the user has 2FA set up, the authentication will fail with a 401 status code. The server will also return a custom error code indicating the reason for the failure. In the case of 2FA, the error code is:
INVALID_2FA_CODE. When this happens, the user will need to supply a one-time code for the login to succeed. -
Roles & Permissions: Additional roles and permission nodes can be supplied in the query parameters of the login route. These give Auth Server additional requirements beyond just a successful login. Services can supply a role or list of permission nodes that the user needs to have in order for the login to succeed. This can be used for services that need special permission to access such as internal tools or sites.
-
Data Return: After a successful login, Auth Server returns with information that is used for authentication with our services. The data that returns depends on the system being used. These systems are the JWT System and the Username & Token system.
JWT System
Coming Soon
Username & Token System
[!IMPORTANT] Lif Platforms is moving away from this system in favor of the new JWT system.
Auth Server uses a username and token system for authentication. After a successful login, Auth Server will return a username and token. The users token is assigned to the user at account creation and rarely changes. When the user wants to authenticate with a service, the client will supply their username and token to the service. The service will then talk to Auth Server to verify the users credentials (the username & token). If successful, the service continues normally. If not, the service will return a 401 status code.
Authorization
Authorization is how Lif Platforms ensures users can only do what they have permission to do. We do this through a roles and permissions system. On this page, we will explain how we use roles and permissions to ensure resources are protected and users only access what they are intended to access.
Roles
[!NOTE] Lif Platforms may be moving away from roles in favor of permission groups. To avoid future issues, it's best to avoid using roles in favor of permission nodes. These are explained on this page.
Auth Server uses roles to define what a user can and cannot access. For example, to access the Lif Mod Site, you will need to have the "MODERATOR" role. Lif Platforms also have a special "SUSPENDED" role. This is how we suspend or ban accounts that have violated our Terms of Service.
Permission Nodes
Auth Server also used permission nodes to define what users can and can't access. Permission nodes are defined in two main parts.
- Namespace: This is the group of actions being accessed. Think of it like a folder for permission nodes.
- Resource: This is the action being taken. Examples include viewing, modifying, or deleting a recourse.
An example of a permission node would be something like mail.send. In this case, "mail" is our namespace and "send" is our recourse or action. Referring to the example again, "mail" is the group of actions we want to take. Other actions may include view, read, or write. In this case, "send" is the action we are taking.
Access Control
[!IMPORTANT] Lif Platforms is moving away from this system in favor of our new API credentials system.
Access control allows services to gain access to sensitive information if needed and perform high risk actions. Examples include getting sensitive account details and sending emails to users. This system is managed though the access-control.yml file. This file contains a list of access keys and their permission nodes. Example:
hfkr-heis-nvte-prmt:
    - Node1
    - Node2
    - Node3
Architecture
In this section, we will go over the architecture of Auth Server and explain how the different Lif Platforms services rely on it for identity and access management. The Auth Server is designed as a centralized, containerized service that acts as the single source of truth for authentication, authorization, and account management.
Core Components
-
Auth API: This is the core of Auth Server. Its what services interact with when they want to authenticate/authorize a user.
-
Database: Auth Server uses MySQL for our database. It stores information such as usernames, passwords, tokens, profile info, permissions, and more.
User Interactions
Users are able to directly interface with Auth Server to perform certain actions. These include logging in, changing passwords, updating profile info, etc. In fact, our account manager My Lif doesn't have it's own backend. It interfaces directly with Auth Server for all of its actions.
Service Interactions
Services can interface with Auth Server for multiple reasons. Mostly, they interface to authenticate and authorize users. Individual services do not have direct access to the database for Auth Server. Instead, services can request information from Auth Server though the API.

Operations
The Operations section provides a practical guide to running, maintaining, and troubleshooting Auth Server. While the Overview and Architecture pages explain what the system does, this section focuses on how to keep it healthy and secure in day‑to‑day use.
Containerization
Auth Server is intended to run inside a Docker container. This has a few benefits.
-
Isolation: Ensures that any problems with the software only affect the container and don't affect the rest of the system.
-
Security: If a bad actor manages to gain access to the container where Auth Server is running, they will only be able to access what's inside the container and will be cut off from the rest of the system. This will "contain the blast" and prevent harm to other services or the machine itself.
-
Ease of Setup: Hosting inside a Docker container makes setup a breeze. Everything you need to run Auth Server is already bundled inside of the Docker image.
-
Ease of Updates: We use Docker in combination with WatchTower. This tool automatically checks for updates, downloads the latest image, and recreates the container with the new image.
Container Setup
In this section, we will learn how to setup the Docker container to run Auth Server.
Preparation
Before we create our container, there are a few things we need to do. First, create a new folder for you container. This will contain all the files necessary for Auth Server to run. Inside that folder, create the following files:
- config.yml
- access-control.yml
Then create the following directories:
- user_images/pfp
- user_images/banner
- logs
Your final folder structure should look like this:
auth-server/
├── config.yml
├── access-control.yml
├── user_images/
│   ├── pfp/
│   └── banner/
└── logs/
Docker Compose
For creating and setting up the container, we recommend using Docker Compose. This will make it easy to maintain in the future. In order to setup your docker-compose.yml file, you will need the following:
-
Image: superior125/lifauthserver:latest
-
Ports: Auth Server runs on port
8002. You will need to map an external port into your container to access Auth Server. -
Volumes: For Auth Server to run, you will need the following volumes mounted:
- ./config.yml
- ./access-control.yml
- ./user_images/pfp
- ./user_images/banner
- ./logs
-
Environment: We reccomend setting the
RUN_ENVIRONMENTvariable to tell Auth Server when environment it it running in. If you are running in production, you must set this toPRODUCTION. If you are running in a dev environment, you can set this toDEVELOPMENTor just not set it at all.
Below is an example of what your docker-compose.yml could look like:
services:
  web:
    image: superior125/lifauthserver:latest
    container_name: lif-auth-server # Optional but recommended
    environment:
      RUN_ENVIRONMENT: PRODUCTION
    ports:
      - "8002:8002"
    volumes:
      - ./config.yml:/config.yml
      - ./access-control.yml:/access-control.yml
      - ./user_images/pfp:/user_images/pfp
      - ./user_images/banner:/user_images/banner
      - ./logs:/logs
    restart: unless-stopped # Optional but recommended
SSL
Auth Server doesn't natively support SSL/HTTPS. For production environments, we recommend putting Auth Server behind a reverse proxy. This will make the process of securing connections with Auth Server over the web significantly easier. We recommend using Nginx for the reverse proxy and CertBot for SSL certificates. Both are free tools.
Config.yml
The config.yml file is used for configuring Auth Server. In this section, we will go over the configuration options and what they do. Here is an example config file:
allow-origins:
- '*'
mail-service-token: Token Here
mail-service-url: Url Here
mailjet-api-key: API Key Here
mailjet-api-secret: API Secret Here
mysql-cert-path: cert.pem
mysql-database: Database Here
mysql-host: Host Here
mysql-password: Password Here
mysql-port: Port Here
mysql-ssl: true
mysql-user: Username Here
Lets dive deeper into each option and explore what it does.
-
allow-origins: This option configures the allowed origins for CORS. This is a browser enforced policy that controls what hosts are allowed to access this resource. Here we've set it to allow all origins.
-
mail-service-token: This is the access token needed to interface with Mail Service. This service handles communication to users via email. This service is being phased out and replaced with MailJet.
-
mail-service-url: This is the URL Auth Server should use to access Mail Service.
-
mailjet-api-key & mailjet-api-secret: These are the configuration options for setting the API key for the MailJet API. We use this API to communicate with customers via email.
-
mysql-cert-path: Local path for the certificate file for MySQL SSL connections. This option is ignored if SSL is disabled.
-
mysql-database: This is the database that Auth Server will use to store and access data.
-
mysql-host: Host configuration for the MySQL server used by Auth Server.
-
mysql-password: Password to the MySQL user assigned to Auth Server.
-
mysql-port: Port the MySQL Server is hosted on. Defaults to 3306.
-
mysql-ssl: Tells Auth Server whether or not to use SSL when connecting to MySQL.
-
mysql-user: MySQL user assigned to Auth Server.
Account Management
Auth Server doesn't just handle authentication and authorization, it also handles account management. This section will cover how account management works with Auth Server.
User Profile
Every user has a profile. It consists of the following components:
- Username
- Pronouns
- Avatar/Profile Pic
- Banner
- Bio
Users can customize/update these components through My Lif.
[!NOTE] At this time, usernames cannot be changed. This due to how Auth Server identifies accounts. Lif Platforms has plans to change this in the future.
Security
In addition to updating user profiles, users can also manage the security of their account though My Lif. Users can change their emails, passwords, as well as setup 2FA.
API Reference
Auth Server uses Swagger UI for visualizing routes and documenting routes, schemas, models, and error codes. Unfortunately, this documentation is not available in production. However, you can access it by running Auth Server locally and heading to http://localhost:8002/docs.